There's
nothing more refreshing than spending time outdoors on long hikes. Here are
six yoga poses hikers should practice to stay safe on their hikes and
injury-free.
When you hear the
term strength training, you might think weight lifting. However, you can
increase muscle tone, definition and muscle size with yoga.
How does yoga build
strength? Different types of yoga poses build muscle tone in different ways.
Standing poses strengthens your legs. Inverted poses are effective to build a
strong core and upper body strength because they flex groups of smaller muscles
to support the body's weight during the pose.
A word
of caution: because you lift your own body weight in yoga, it may take a lot
more skill, time and determination to build muscle than it would with lifting
weights.
HERO POSE
Hero Pose may appear to be a
regular position to watch TV or sit, (except the advanced sleeping pose, one assumes !) however there are many particulars to
executing this pose safely. It is a pose that requires proper attention and a
strong foundation

How to: Hero Pose
Starting on your hands and knees
slowly sit back onto your heels. The most important part of this pose is to
constantly check that the tops of your feet are on the floor, bottoms of the
feet are completely facing up. Try to have your thighs together, unless you
feel strain in the knees, then, separate them accordingly. This is basically
the entire pose, although there are many subtleties too. For some just sitting
back on the heels can prove to be painful. If this is the case place a block on
the floor between your feet and sit back on the block until you are secure and
open enough to take it away. You want to get to the point where you can sit up
nice and tall while sitting on the heels. Press the shins and tops of the feet
into the earth and ground through the little toe side of the foot. Lift your
rib cage evenly and lengthen through the crown of your head. Relax your
shoulders. If you are extremely tight or are rehabbing from knee surgery then
roll up a towel behind your knees and then sit back. This will reduce any risk
of over flexion of the knee.
Rest your hands on your thighs and relax into your breath. If you have no pain in the knees and the ankles and shins are open and flexible enough, then move deeper into the pose by separating the feet gently roll the thighs inward and try to sit on the floor between your feet. It will take time and practice to deepen this pose. Try to remain tall and lifted and not round the back at all.
Rest your hands on your thighs and relax into your breath. If you have no pain in the knees and the ankles and shins are open and flexible enough, then move deeper into the pose by separating the feet gently roll the thighs inward and try to sit on the floor between your feet. It will take time and practice to deepen this pose. Try to remain tall and lifted and not round the back at all.
Benefits of Hero Pose
The role of Hero pose is vast.
Done properly and consistently, the most noticeable benefits include:
- Increases
flexibility in hips, legs and knees
- Encourages
proper alignment in hips, legs and knees
- Opens
hips
- Stretches
quads
- Encourages
and trains internal rotation
- Strengthens
the low back while lengthening the spine
- Good
for virility
For the Lay person or yogi, hero's
pose is a great pose to align the body and find comfort in to meditate. It
gives the practitioner the opportunity to strengthen the back and spine. At the
same time open the chest and heart and help increase lung capacity. It is a
great cooling pose to find your centre and add some shoulder stretches at the
same time.
Either option for your toe position ~
Toes tucked: This helps
athletes who rely on speed and agility open up the plantar fascia of the foot.
It opens under the toes. Most importantly it stretches and keeps supple the
vulnerable Achilles tendon.
Toes untucked: As mention above,
this variation is great to keep the shins free of strain and the tops of the
feet open.
Although you should always consult your physician and research a properly trained Yoga teacher before starting a yoga practice, there are a few instances where you should avoid this pose entirely:
Although you should always consult your physician and research a properly trained Yoga teacher before starting a yoga practice, there are a few instances where you should avoid this pose entirely:
- Modifications
should be made if you are currently suffering knee pain
- Modifications
can be made if you have just had surgery
- If you have pins and plates in your knees you should avoid this pose all together
STANDING BACKBEND

The same onward and upward posture
that carries you up the hills and mountains tends to force a forward collapse
of the torso. When not hiking, it's important to open the chest to maintain a
proper posture. An open chest is critical to breathe deeply. Anyone who has
ever hiked knows the magnitude of sustaining full constant deep breathing for
effective climbing.

Standing Forward
Bend
Many athletes know it's important to
keep the hamstrings flexible and strong. The more open the hamstrings are the
less strain on your knees and the better your posture will be. When the
hamstrings are tight, the pelvis is misaligned and therefore cause strain in
the back. Use gravity to your advantage—hold a standing forward bend for
several minutes. This will help oJust like Downward Facing Dog, Standing
Forward Bend should be a staple pose in your yoga routine. Even if you have
never stepped into a yoga studio or attempted a DVD, chances are you have
folded over into simple standing forward bend.
How to: Standing
Forward Bend
As basic as you may think this pose
is, it is very important to learn proper technique, in order to keep your back
safe, and fully open your hamstrings.
Stand with your
feet shoulders width apart and take time to make sure they are parallel. Plug
your feet equally into the floor, with your weight slightly forward, but not so
far that you grip your toes. Bend your knees a little and fold over at your
hips. Never fold from your waist. Connect your chest and belly to your thighs,
while the knees are still bent. Constantly check that your knees, when bent,
track over your toes. It is key for the safety and integrity of the knee joint
to have the knees positioned this way at all times. Keep your chest and belly
connected to your thighs and slowly start to straighten your knees, as if you
are lifting your hips up to the sky. Once you feel like your chest is
separating from your legs, you've gone a little too far.
Helps to open your hamstrings and help you improve legs and back strength.
If you feel stable
enough, grab your elbows and hang. Start this for one minute holds and work up
to 10 minutes. Continue to check that your feet line up with each other and
that they stay parallel. Although it will be tempting to close your eyes and
relax here, DON'T. You will lose your balance. Don't be afraid to sway back and
forth and bend and straighten the knees, anything to negotiate further into the
stubborn hamstrings. I always encourage my students to drape a 12-pound sandbag
over their forearms while holding the pose. This method will get you to the
next level faster. Another variation is to do this same pose with your back
leaning up against the wall. Then you will really feel the hamstrings deep.
Benefits of
Standing Forward Bend
When done properly and consistently,
the most noticeable benefits of Standing Forward Ben include:
- Calm
the brain
- Relieve
stress
- Great
for mild depression
- Stretch
the hamstrings, calves, and hips
- Strengthen
the thighs and knees
- Improve
digestion
- Reduce
anxiety
Standing Forward Bend clearly opens
the hamstrings. It is very important to keep the hamstrings open to reduce
strain and tightness in the back. Long hours, hard work, long drives and poor
sleep are only a few things that contribute to tight backs. Since the hamstring
attaches on the lowest part of the pelvis, when the legs are rigid they easily
pull down on the pelvis putting unnecessary stress on the back. If you don't
address this, a chain reaction will happen over time where tight hamstrings
lead to a strained back which leads to unstable hips and knee problems.
You won't see improvements over
night, but in time your legs will free up and you will see a huge difference in
how your body feels--so stay committed. It is a great pose to focus on your
breath and practice visualization, actually see your hamstrings open up.
For the athlete, this pose is
important for assessing postural needs and imbalances, as well as the above. It
is important for athletes to constantly evaluate their bodies. Sports figures
from every game can benefit from hamstring improvement. If an athlete has
flexible legs their speed will improve. I stress that the formula for power is
strength plus flexibility. Speed and better agility are always concerns for
athletes. Having less strain on your back reduces reduce injury and increases
time of play.
A few instances where you should
avoid this pose entirely:
- If
you recently had back surgery (have a trained teacher near)
- You should also have your teacher near if you have recently had knee surgery or hamstring surgery
Pigeon

To climb and hike,
you engage your glutes to the max. There's no better way to open the glutes
than hanging out in pigeon pose for three to five minutes on each side.Everyone can benefit from the hip
opener known as pigeon pose, or stress and tension can build up in the hips and
create tightness. Practicing pigeon can make for supple, more flexible hips.
Sometimes this pose will take your breath away with its depth, but stick with
it and you'll notice the immediate improvement.
How to: Pigeon Pose
How to: Pigeon Pose
-
Start
on all fours in a squared table pose.
- Slide
the right knee forward toward your right hand. Angle your right knee at
two o'clock.
- Slide
your left leg back as far as your hips will allow.
- Keep
your hips square to the floor. If your hips are not square, there will be
unnecessary force on your back, and you won't be able to open the hips to
their fullest.
- If
you're not feeling a deep stretch in your right glute, slide the right
foot forward--little by little--toward your left hand. With practice,
bring your foot parallel with the front edge of your mat
- Your
right thigh should have an external rotation, and your left thigh should
have a slight internal rotation. This keeps pressure off the knee cap.
- Depending
on how you feel, you will be upright on your hands while sinking the hips
forward and down. Level two will rest on their forearms, and level three
will rest the chest on the floor with the arms fully extended in front of
you.
- To
get full release in the hips, breathe and release the belly. Stay in this
position anywhere from 10 breaths to five minutes
Benefits
of Pigeon Pose
When done properly and consistently, pigeon pose can:
When done properly and consistently, pigeon pose can:
- Stimulate
the internal organs
- Stretch
deep glutes
- Stretch
groins and psoas (a long muscle on the side of your vertebral column and
pelvis)
- Relieve
impinged piriformis and alleviate sciatic pain
- Help
with urinary disorders
It is a primal response to tighten up when under excessive stress or trauma. This tension releases easily with pigeon pose.
For the athlete, this pose is critical to overall health, speed and agility. Open hips relieve the stress transferred to the knees when hips are tight. Less knee strain means a greater range of motion for the pivot sports such as tennis, basketball or soccer, reducing risk to the ACL (anterior cruciate ligament). Clear hips also give the back a full range of motion. This helps athletes avoid lower back strains that often plague them. Flexible and aligned hips are essential for an athletes' best performance.
The few instances when you should avoid this pose entirely are if you have:
- A
sacroiliac or back injury
- An
ankle injury
- Certain
knee injuries
- Extreme tightness in the hips
·Revolving Triangle
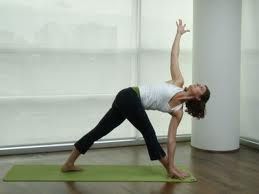
It's
important to keep the illiotibial bands, IT band, which run alongside the
outside of your thigh open and flexible. The IT band helps protect your knees
and gives you the best range of motion. Although the IT bands are hard to
stretch, try revolving triangle. If balance is an issue lay on your back, grab
you right big toe with your left hand. Or, put a strap around your right foot
and hold both sides of the strap with your left hand. Extend the right leg and
bring it across your body simulating a revolving triangle while on the ground.
Warrior I

Warrior I

The strength and flexibility, good for your back and shoulders.
Stand tall with your feet together and arms by your sides. Separate your feet 4 to 5 feet apart, keeping them parallel. Inhale and lift your arms up overhead shoulder-width apart, palms facing each other.
Exhale and turn your right foot and leg 90 degrees out to the right. Turn your left foot in, toward the right, at a 45-degree angle. Rotate your hips and torso to face the same direction as your right leg. Chances are your left hip will not be completely forward. That’s the beauty of this pose: Squaring both hips so they face the wall in front of you may seem like it takes a few lifetimes, but when it happens, you will have greatly increased your flexibility.
Take a deep breath. As you exhale, bend your right knee so your right thigh and shin form a right angle. Less than 90 degrees is okay; bend your knee as far as you can while keeping the outer edges of your back foot pressing flat into the floor. Don’t collapse in your back ankle; try to pull up through your left arch (the ankle stays on the ground) to protect that left knee joint. To align your spine, focus on drawing your ribs in toward your body, pressing your tailbone toward the floor, and elongating the back of your neck. Hold for 3 to 10 slow, deep breaths—about an 8-second inhale and 8-second exhale, both through the nose.
To come out of the pose, lower your arms, straighten your right knee, and return your feet to their starting position. Repeat on the left.
Happy bending & stretching.

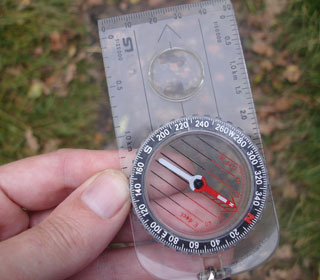 If you've used a compass to orientate the map, then you'll already know which way you're facing. If you've worked out where you are and where you want to go, then all you need to do is work out what direction you need to walk in, face that way and walk!
  Your map uses symbols and coloured lines to represent certain things. Some of these are obvious, some less so. I'm not going to give all of the symbols here, because they're listed at the bottom of your OS map!


